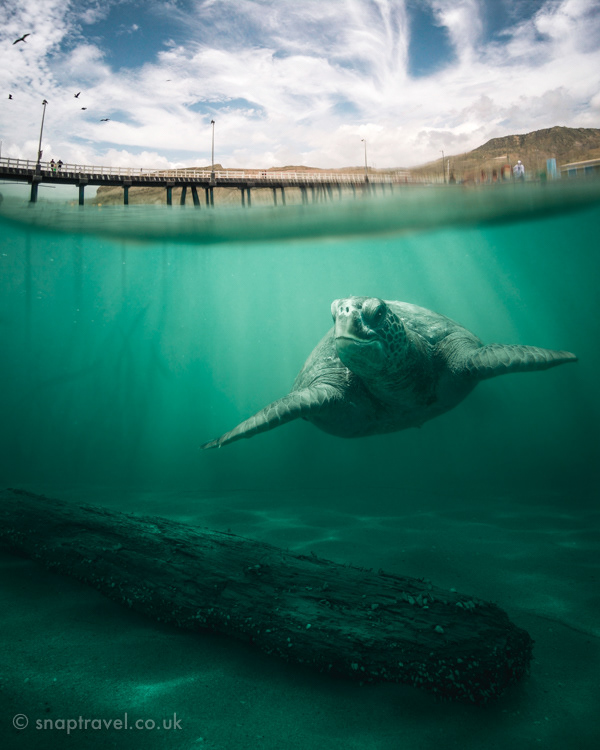
This is a composite image made up of three separate photos. In this video I’ll demonstrate how I blended the photos together using layers, masks, and blending modes, to create an underwater scene with a smiling sea turtle.
Final Image
Walk Through
First drag and drop all the images into one document using the ‘move’ tool. Use ‘layer masks’ to blend the three images together. A ‘Solid Colour’ layer with the blend mode set to 'colour' placed above the driftwood photo with help match the colours to the other two photos.
To Create The Sun Rays Effect
Create a new document the same width as the original photo, (in this case 2848px by 2848px). Then, from the menus select ‘filters-render-clouds.’ This will fill the image with a cloudy effect. Create a heavy vignette on these clouds by selecting ‘filter-lens correction…, custom' and adjusting the vignette sliders.
Next, use the ‘free transform’ and ‘transform-perspective’ tools from the 'edit' menu to change the size of the clouds layer. Make it look like the waters surface viewed from below, compress it upwards and drag out the top. Then, go to 'filter-filter gallery…’ and choose 'plastic wrap,' use the sliders to create a water surface look as realistic as possible. After that, go to 'select-colour range…’ and click on one of the whitest parts of the image. Use the sliders to select only the highlights. Then, (with one of the selection tools selected) right click on the selection and pick ‘layer via copy.’
There will now be two layers, turn off the bottom 'cloudy' layer by clicking the eye icon, or just delete it. With the top layer selected go to ‘filter-blur-radial blur…’ and choose blur method ‘zoom,’ amount ‘100%’ and quality ‘best,’ drag the angle of the zoom all the way to the top middle. Repeat this once more by going to ‘select’ and clicking the first option from the drop down menu, it should say ‘radial blur.’ Now, duplicate the layer twice, by dragging it to the 'new layer icon' to intensify the look, then shift or cmd/ctrl click to select all three layers (not the original cloud layer) then, right click and select ‘merge layers.’ You now have a sun rays effect you can drag and drop into your photo. Use the 'free transform' tool to it make fit naturally, and a layer mask to remove it from unwanted areas.
Experiment with different layer blend modes for different looks, 'normal,' 'screen' and 'soft light' work well. You can also blur the layer using 'gaussian blur' if it looks too harsh, and also adjust the layer opacity.
To Create The Dappled Light Effect On The Ocean Floor
Go back to the same document you used for the sun rays effect. Fill it with the cloudy effect again by making sure you have black and white set as your foreground and background colours, and going to 'filter-render-clouds.' Next, go to ‘filter-other-minimum…’ choose to preserve ‘roundness' in the drop down menu and use the slider to create an effect with lots of black and white circles. The size of these circles will change the way the final effect looks, so experiment a bit to see what kind of look works best for you. You can now drag and drop this layer into your photo. Use the 'free transform' and ‘transform-perspective’ tools in the 'edit' menu to make the layer fit on the ocean floor. Place the layer underneath the 'solid colour' layer to make it match the colour, or create another 'solid colour' layer change the blend mode to 'colour' and clip it to the dappled effect layer. Finally, change the blend mode of the effects layer to 'colour dodge' or 'linear dodge' and adjust the opacity to taste.
To Dodge And Burn Non-Destructively
Create a new layer above the layer you want to dodge and burn. Clip the new layer to the layer below by holding down opt(Mac)/alt(Win) and clicking between the layers. Then, change the blending mode of the new layer to ‘overlay’ and fill the new layer with 50% grey by going to ‘edit-fill’ and selecting '50% grey' from the drop down menu. It’s now possible to apply dodging and burning to this new layer without touching the original layer below.
To Get A More Surreal, Cartoon Look
Used the ‘filter-liquify…’ to give the turtle a slight smile and change the shape of its eyes. You can change the layer to a ‘smart object’ first if you wish to work non-destructively. To create the catch light in the eye, simply create a new layer and dab a white brush on the eye. Position and fade the opacity of the layer until it looks natural.
Add Shadow And Light
Create new layers and paint in black and white (on separate layers.) For shadows change the layer blend mode to ‘multiply.’ Paint in black using the ‘paint brush’ where you want the shadow and clean up the edges with the ‘erase’ tool. Then, change the layers opacity until it looks realistic. For the light, do the same on a new layer painting with white, but change the layer blending mode to either ‘soft light’ or ‘screen.’
Paint in the pier legs and seaweed on new layers, dropping the opacity to get the right look. The seaweed brush I used was downloaded, for free, from www.brusheezy.com.
Change The Colour
To get the right colour look for the image use ‘lookup colour’ (in the layers window click the black and white circle to add an adjustment or fill layer) and add several 3D LUTS. Drop the opacity to get the right effect and use the layer masks to paint the effect out of areas where it isn't needed.
Finishing Touches
I like to finish my images using the ‘camera raw filter…’ to add a vignette and fine-tune the tone curve, colours, and exposure. To do this, create one final layer that contains all the layers in the image, (basically flattening the image, but into a new layer instead of throwing all the layers away.) Use the keyboard shortcut cmd+opt+shift+E (Mac) ctrl+alt+shift+E (Win) to create the new layer. Then, select ‘filter-camera raw filters….’ You can convert the layer to a ‘smart object’ first if you wish to work non-destructively.
If you enjoyed this, please like and subscribe to my YouTube channel for more videos.